How to Make Beeswax Wraps at Home
Did you know that you can make your own beeswax wraps? And if you are a bit crafty, it’s not that hard!
The first step is purchasing a DIY Beeswax Kit, you can find one we have made especially for your Sunday crafternoons here.
Making your own beeswax wraps is a fun activity to share with your friends or family – they make great gifts and are of course so handy around the home – but the best bit? You can choose your own design!
If you are an upcycling queen, you can reuse your old shirts or bits of material that you can’t let go of, and instead of wrapping yourself in something you love, wrap your food in something you love! Making your own beeswax wraps is a great way to upcycle clothes and bits of material you treasure (not all material is suitable so pick carefully!) plus it can be so fun to browse op shops looking for fun prints for your wraps.
We love seeing our fave patterns and materials have a new life, it brings us so much joy to reach into the fridge and see our avo looking super cute and staying fresh!
With our DIY kits, you can make up to 8 beautiful wraps that last up to 12 months with the right care. If you are refreshing your old wraps, your DIY mix block will make even more wraps.
Here is your guide on how to use your DIY Beeswax Kit. Have fun!
how do you make beeswax wraps?
Beeswax Wraps can be made at home, with a few easy kitchen utensils and the most important ingredient: a block of beeswax.
We highly recommend using our DIY Beeswax Wrap wax mix, which includes three ingredients; wax, tree resin, and oil. You can attempt to make your own, but we don’t recommend it as the ingredients are hard to find in small quantities and it can be a messy job; so we thought we would sort that tricky bit for you.
The DIY Beeswax Wrap Kit comes with instructions but we have them detailed here for your reference.
WHAT do i need to make beeswax wraps?
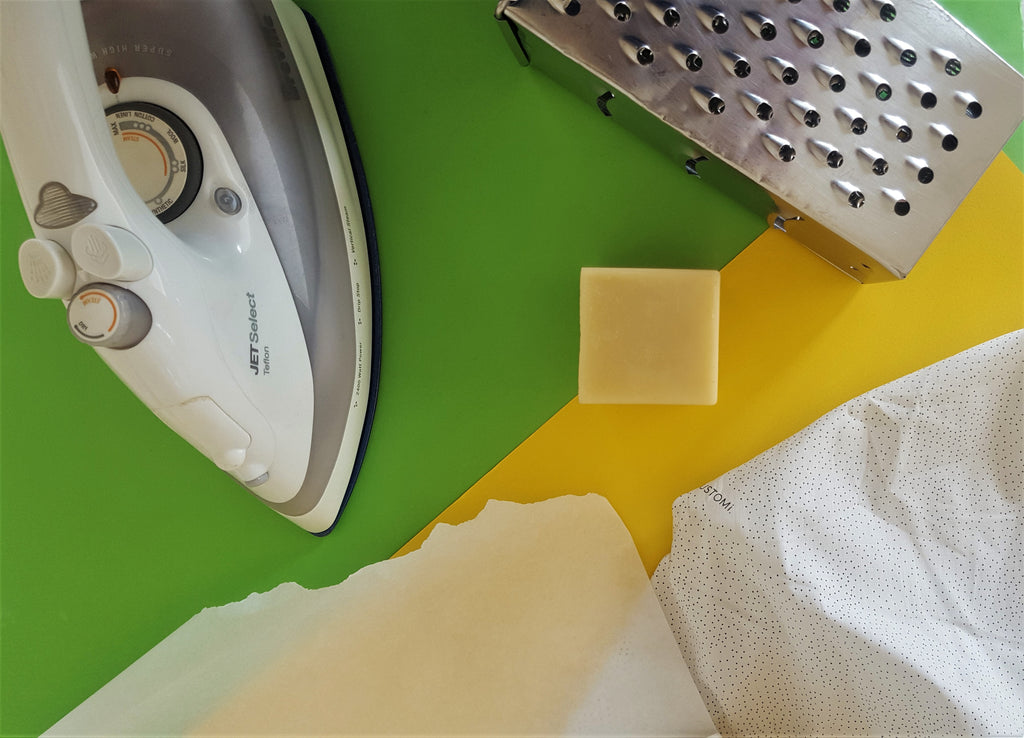
To make Beeswax Wraps at home you will need your DIY Beeswax Wrap kit, a grater, cotton fabric, iron, newspaper, and two sheets of baking paper. The grater can be easily cleaned with boiling water.
Before we get started, there are a few key tips for working with beeswax.
Keeping your home clean while working with beeswax
Cleaning beeswax off surfaces and your clothes is possible. If you have beeswax on your clothes, take an old towel and an iron. With the towel covering the waxy spot, iron the area. The towel will soak up some of the wax. The same technique can be used if you get wax on your carpet or other textile surfaces.
The best case scenario is that you protect your workspace with a protective covering, like placing a newspaper or an old sheet on the floor, and wear old clothing or an apron.
How do I get beeswax off my hands?
You will likely get a small amount of beeswax on your fingertips. Unfortunately, beeswax does not mix with water, so simply using soap will not get the wax off. We have found a great method which works every time to clean beeswax off skin – take an oil (like olive oil, jojoba or any kitchen oil) and rub it into the affected waxy area. Now, wash the oil off with hot soapy water.
Choosing the right fabric for your beeswax wraps
The best fabric to use for beeswax wraps will be a natural fibre, lightweight, tight weave fabric, such as cotton poplin or voile. The thinner and tighter the material is, the softer, and more pliable the wraps will be. Thicker fabric such as lightweight canvas or cotton drill will work, however, your wraps will turn out thicker, stiffer, and consume more wax to make. Avoid synthetics as the wax will sit on the surface and likely break away. The natural fibres absorb the wax (your wrap will last longer) and are compostable.
beeswax wraps ingredients:
- Beeswax
- Jojoba oil
- Natural tree resin
Equipment list to make beeswax wraps
- Cheese grater
- Iron
- 2 strips of baking paper
- Old towel
- Old newspaper, or a floor covering
- Your chosen fabric (see above for how to choose the right fabric for your wraps)

step by step guide on how to make beeswax wraps
Fabric Preparation
- Cover a flat, heat-resistant working surface (ironing board or a bench, etc.) with an old towel.
- Place a sheet of baking paper over the towel and lay the fabric to be waxed in the center of the paper sheet.
- Prepare the wax by grating it into small pellets with a cheese grater. Spread the wax pellets evenly over the fabric – approximately 0.5cm gaps between the pellets will be enough for a lightweight fabric, if you have a thicker material, you may need more (you can always add more after the initial process if needed). Thicker wax will make the wraps stickier
- Cover the fabric with the remaining sheet of baking paper. Make sure the fabric is completely covered and no wax is exposed (exposed wax will get onto your iron!)
- Turn the iron on to the hottest setting without steam.
Waxing the fabric
- With your iron flat on the surface, begin slowly ironing in a circular motion from the center to the edges of the fabric. Using even pressure the wax will melt and spread evenly as you move, you should be able to notice pools of wax or uncovered sections of fabric through the paper.
- Check the wax distribution by gently lifting the paper. A thin wax coating will appear wet but have a slightly dull or drier appearance. Thicker, sticker wraps will appear wet and slightly shiny, or more wet – add more pellets to areas that look dry, using the iron to squeeze the wax around until it is distributed relatively evenly.
Finishing and drying your beeswax wrap
- This step needs to be done quite quickly before the wax becomes solid. Make sure the entire wrap has been heated just before you remove it from the baking paper. It will appear completely wet and the paper will look translucent. To remove the wrap quickly peel the top sheet of baking paper from one end away from the wrap. Grab the wrap by 2 corners and gently, but quickly, peel it off the bottom sheet of paper. If you notice large areas of wax on the paper, it means the wax has hardened and you need to replace the paper and apply heat again before removing, otherwise your wraps will be lumpy! Making sure the entire wrap has been heated up just prior to removing the wrap will prevent this. Once the surface underneath the wrap is warm, this becomes much easier.
- Hold the freshly waxed fabric for a few seconds so that the wax hardens slightly. This will help prevent it from sticking to itself when hung. At room temperature, your wrap will be touch-dry in 20-40 seconds. We find it easier to hold up rather than get a washing line covered in wax!
- Bonus step: trim any edges which are messy or frayed with a pair of scissors or a stanley knife and a ruler.
- Give yourself a high-five for making your beeswax wrap!
- Enjoy it 😊
More hot tips on Beeswax
Did you know that Beeswax Wraps aren't just for food? Check out this blog to learn our top 5 reasons why we love beeswax wraps!
And while you're learning about Beeswax Wraps, read about the history of them - they have actually been used for centuries! Read about it here.


Leave a comment